Lemon Curd Recipe

8 Comments

If you’ve been reading SipChompChew for a while you would have seen my Valentines Hearts on Soup tutorial. I’ve been wanting to make these tarts for some time now and last Wednesday night was the perfect opportunity. I had some girlfriends over for dinner and and a wedding photo presentation and I thought it would be really cute to make some wedding themed desserts. Using the same technique as the soup I filled some sweet pastry cases with lemon curd and then used raspberry curd to make the hearts. I do love lemon curd, I have a dirty little habit of eating it straight from the jar with a spoon!

SCC Lemon Curd Jar with Spoon

SCC Lemon and Raspberry Tart

Here’s my recipe for lemon curd. This should keep for a couple of weeks. I’ve read that you can freeze it but I’ve never had a need to as this recipe makes enough to fill a half liter kilner jar which is easily used up in two weeks for us. You can really get creative with lemon curd, it can top pancakes, pies, toast, scones, fill Madeleines and cakes. Add to granola or yogurt or ice cream, I could go on and on!


You will need

  • 4 Lemons, Zest and juice
  • 200g Caster Sugar
  • 100g Unsalted butter, cubed
  • One egg yolk plus three whole eggs, beaten
  • 500ml jar, sterilised

SCC Lemon Curd in Jar

First you need the lemons to be warm. You get more juice out of warm lemons, a 20 second blast in the microwave should do the trick. Add all the ingredients except the eggs to a saucepan and stir on a low heat until the butter is melted. Now add the eggs. You’ll need to continuously stir else you’ll end up with a strange lemon scrambled egg mixture that resembles something out of The BFG if it’s just left to sit! After about 5 minutes, the curd should coat the back of a spoon, turn off the heat and pour through a fine sieve or cheese cloth. It won’t be the thickness that curds are known for until it’s set so allow to cool for a while before transferring it to your prepared jar, store in the fridge once cool.

I’ll post my recipe for raspberry curd soon so you can make those oh so cute heart shapes!


SCC Lemon Tart on Stand


As I’m clearly in a hearts and flowers kind of mood, I thought I’d share one of our wedding photos with you. We chose a reportage style of photography and David Jones completely nailed it – he really captured so many special moments. Here’s one of my many favourite pictures. As you can see we had perfect weather, not an April Shower in sight!

hl2350

Back from Honeybobs!

4 Comments

You know? Like holibobs but honeymoon-bobs? Well my husband knew that’s what I meant the first time I said it but maybe that’s why he’s my husband!

When I cooked dinner  last tuesday, it was the first time I had cooked since 9th April! That was our last meal at home before we left for England to wed and then off on our two week honeybobs in the Maldives. Although our honeymoon was amazing in every aspect, after that amount of time we were definitely ready to come home and I was missing Bryan (the pug) heaps!

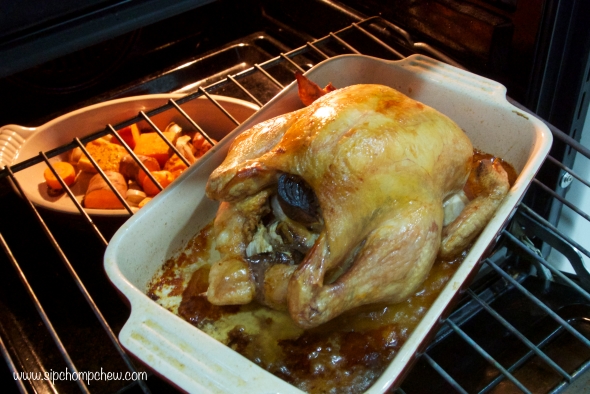
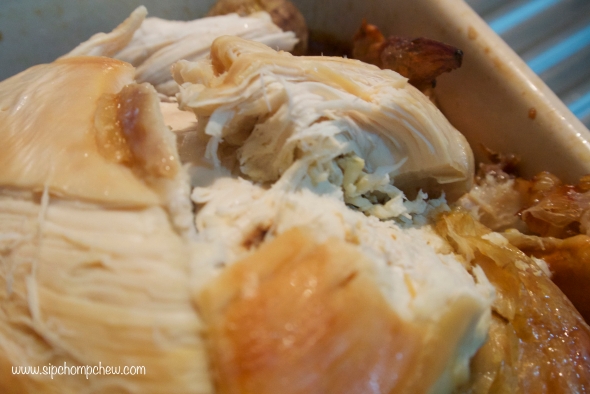
I always have the same craving when I’ve been away from home for a while and it’s always roast chicken. I think it’s because it was the most common Sunday roast my mum would make therefore making it comfort food. When we landed late on Monday night I was just about ready for my roast chicken. Having learned early on in my Singapore experience, if you want your whole chicken to come without head and feet, then you need to pick up the chicken in the packaging which states ‘without head and feet’. This is always something I pay attention to as with the first whole chicken I bought here, I had no idea until I took the bird out of it’s packaging and placed it on a tray to marinade, much to my horror I ended up eye to eye to the clucker. As I clearly still had Maldives brain on, when I picked up my first chicken packet last week and saw it said with head and feet, I just picked up the packet in the next display not checking which parts of the anatomy were still attached. I realised my error when I opened the packet and I saw cockscomb and wattles  hanging down, in a slight panic, I tried to hack off the neck with my favourite ceramic kitchen knife which my dad bought me for Christmas only to break the knife rather than the spine of the bird! Tuesday was clearly not my day. Anyhow, I stuffed my chicken with some fresh sage leaves, half a lemon and half an onion before popping in the oven at around 160 degrees for 90 minutes. We had some delicious chicken, not forgetting that lovely crispy skin, with new potatoes, green beans, roasted sweet potato and carrot. Accompanied by Bisto, as I keep forgetting to pick up gravy browning to make our passed down family recipe homemade gravy, of course we enjoyed it with a dollop of cranberry sauce. 

A lot of people have a certain food from home they crave when they’ve been traveling, my husband always fancies a cheddar and branston sandwich on white crusty rolls. What’s your comfort food craving after a spell away from home?


SCC Chicken in Oven SCC Chicken and Sweet potatoes SCC Chicken Meat SCC Chicken Skin


Sausage Rolls

5 Comments

I know I mention quite often about being an expat and missing certain foods at home. Despite this, my passion for food is more about just the cooking and the eating, it’s amazing how a specific smell or taste can take you back to a certain point in your life. For some reason, when I think of/smell/eat sausage rolls, it always reminds me of being at a bakery in Coleford, the small town which I grew up just outside of,  my Mum was treating my dad to some of their freshly made sausage rolls. It’s not a huge event but I remember our conversation and joining the long queue to get our goods.

I don’t make sausage rolls that much as they don’t really fit in too well with all the healthy food I’ve been trying to stick too but for a weekend lunch, soup and a sausage roll is so very comforting it’s one of my fiancé’s favourite things to have over a lazy weekend, although he did admit to me yesterday that he thinks it’s a weird combination. Please can you guys let me know whether it’s just me or is soup and a sausage roll a strange mix?!

I only made these for the first time early last summer, we had friends over for our leaving party in Geneva and I made a batch for the guys whilst they were watching the football. Gone, in, seconds, it was like they all performed a disappearing trick with them! They are so easy to make and pretty quick to cook. You can eat them cold or straight from the oven (my favourite!). All you need is some sausages and a pack of frozen puff pastry. I always throw in some additional flavours too. Here’s the recipe for the ones I made that last weekend in Geneva.

Yield: Two large sausage rolls

You will need:

  • Sausages – the type of sausage is entirely up to you but I would recommend using a standard pork sausage. No need to mess around with something that’s already great! I used 4 standard sized sausages. Skins removed.
  • 1.5 Tbsp Colmans Bramley Apple Sauce
  • 1 spring onion, finely sliced
  • Two sheets of frozen puff pastry, approx 20cm x 20cm
  • One beaten egg for washing the pastry

Preheat the oven to 180 degrees

Get the pastry out of the freezer to defrost, you may want to do this the day before but here in Singapore, I buy ready rolled sheets of pastry and once I’ve taken it out of the freezer it’s ready to go in about 5 minutes! Mash together all your other ingredients except the egg. Lay your pastry on a baking sheet and place half your sausage meat mix in a line down the centre of the pastry. Brush the edges with the beaten egg. Fold over both the bottom and the top edges of the pastry and lightly press down to stick them to the egg wash, this is to encase the ends and ensure no precious filling spills out! Brush your new top and bottom edges with egg before folding each side over to cover the sausage meat. Carefully flip over and place on a baking sheet so that the pastry edges are on the underside and cannot be seen before making some gentle slits along the top with a sharp knife. Cover the top in one final layer of egg wash. Repeat with the second sheet of puff pastry and the remaining sausage meat. Pop in the oven for about 20 minutes until cooked through and the pastry is golden. You can transfer to a cooling rack for later but they are so much better eaten right away. Simply slice each roll into 5 or 6 pieces for party finger food.

SCC Sausage Rolls Folding 1

Madeleines

1 Comment

I love french supermarkets, in fact I love any new, foreign supermarket. Snooping around all the local produce and all the new brands, seeing what is to offer. When we lived in Geneva, we used to occasionally pop over the boarder into France to do our food shop. We didn’t do this too often as my fiancé hates food shopping (and the Swiss wouldn’t let me drive so he had to come), but if we wanted to buy more than a couple of boxes of beers then it would be worth the trip (for him!). Whenever we would pop into Carrefour, he would always pick up a bag of madeleines, the kind where you have a huge pack of about 50, each individually wrapped. They have a sell by date of about 6 months and one would expect them to last at least half that time . Well they never saw the end of a week in our home!

Cold Storage, our new local supermarket, do stock both Carrefour and Casino produce for the french expats and francophiles of Singapore. But until they start stocking his favourite little cakes it looks like I’m going to be pulling out my madeleine tray and switching on the oven. For my recipe I turn to Michel Roux Jr. He has a great madeleine recipe that is easy to follow in 3 simple steps. And his wine pairing suggestion? Prosecco. Do you need further tempting to give this one a try and pop open a bottle of fizz? Unfortunately it was 11am when I made these and I was home alone so some suspicions would have been raised should I have opted for the bubbles rather than a mug of coffee to go with my share.

The first batch I made looked a tad on the golden side and a little crisper than desired. I decided to turn down my oven a tad, it is the first time I have baked cakes since we moved here so I am still getting used to where the hot spots are and what temperature works best. It also doesn’t help that the temperature dial shows 160 degrees at 5 o’clock and 180 degrees at 7 o’clock, I don’t trust that anything in between these two is very accurate as the spacing is too big compared to the others. Anyway, back to madeleines. The second batch turned out much better. I had enough mixture to pour a little more into each cup leaving just a couple of millimeters space at the top.

I whisked the eggs and sugar together with my electric whisk to make them nice and frothy quickly

I then used my hand whisk to combine all the other ingredients

I then used my hand whisk to combine all the other ingredients so as not to over beat them, it looks a bit like frothy custard at this stage

Both batches cooling. Which one do you think looks best?

Both batches cooling. Which one do you think looks best?

Close up, although my camera decide to focus on the drooling pug - bless

Close up, although my camera decide to focus on the drooling pug – bless!

You can see here how light batch 2 look in the middle

You can see here how soft and light batch 2 look in the middle

Michel says they should be eaten within an hour of removing from the oven – well if he insists, it would be rude not too. Lets just not tell my fiancé I made madeleines today….

Caesar Salad Dressing – The Healthy Alternative

2 Comments

This isn’t the most seasonal recipe to post on the last day of September but then again we are no longer eating the most seasonal foods in our household when the only change throughout the year is ‘Monsoon Season’ and ‘not Monsoon Season’.

I am a real sauce lover. Be it gravy drowning my Sunday roast or a big dollop of hollandaise on a juicy steak, sauce really completes a meal for me. So with the wedding coming up it doesn’t help with my healthy eating when I want drink the stuff!

One of the few salads I can get the main man in my life to eat as a meal in itself  is Chicken Caesar – he loves it. I’ve managed to adapt the sauce so it still has that caesar taste but is a bit lighter on the calories. This recipe makes enough to serve 4 people.

What you’ll need:

SCC Ceasar Ingredients

One small or half of one large clove of garlic, minced

75g Low Fat Mayonnaise

40g Parmesan, grated

Juice of half a lemon

1 tsp Colmans English Mustard Powder

SCC Ceasar Dressing in Mug

Mix all the ingredients together until well blended. Traditionally, the salad is tossed in the dressing before being served but we’re cutting down on calories here so divide the dressing evenly between four mini dishes and season with some freshly ground black pepper.

SCC Ceasar Salad Dressing

Get some chicken breasts in the grill pan and start preparing that salad!

SSC Grilled Chicken

Another way I cut down on calories with this is to dip my fork in the dressing before loading it up with salad, that way I get the taste of the dressing with every mouthful without the same calories as smothering the entire salad with it.  And I don’t feel as guilty enjoying a nice cold glass of Riesling Gewurztraminer blend with my Saturday lunch.

Not you traditional Ceasar salad but a yummy Chicken Salad with a just as yummy Caesar Dressing!

Not your traditional Caesar salad but a yummy Chicken Salad with a just as yummy Caesar Dressing!

Quiche au Gruyère

2 Comments

Quiche was always a favorite for Mum and me. She would sometimes bring home a couple of slices of Cheese and Onion from the deli counter where she worked many years ago. It would put a smile on my face to see that plastic bag in the fridge with the sticker printout reading QUICHE.

It’s only in recent years that I’ve extended myself to eating Quiche Lorraine and other varieties rather than just the cheese and onion from my childhood, if you know me well, then you’ll know I’m a sucker for almost anything cheese and onion flavored.

In Switzerland, bacon lardons and Gruyère, the swiss cheese traditionally used in Quiche au Gruyère, are both readily available and reasonably priced and so are great ready made pastries if you don’t have neither the time nor willingness to make your own. I guess that’s why I eventually perfected this recipe in Geneva. I much prefer homemade pastry although I now have to give it a miss and go straight for the ready made here in Singapore. My kitchen temperature generally averages at around 30 degrees and being one of the only rooms in our condo without air conditioning, it’s difficult to make a tasty pastry. As the old saying goes, cold hands make good pastry. This is because the warmer the fat is, the more flour it absorbs and the pastry becomes tough. That aside, I have actually made this a couple of times without any pastry at all which cuts out some of those calories too!

What you’ll need…

SCC Quiche Ingredients

Short crust pastry, be it homemade or straight from the store or just leave it out completely!

Butter for greasing

100g cooked bacon lardons

4 eggs

160ml double cream

75g Gruyere

100ml milk

20cm, circular Flan dish  – If your dish is slightly smaller, you can just pour any left over mixture into muffin tins to make make mini crustless quiches. Cook for about 20 mins until golden and set and pop them in the fridge once cooled and they make great little snacks!

 SCC Fried Bacon

Preheat the (fan assisted) oven to 160 degrees. If you are using pastry, you will need to blind bake the pastry in the flan dish. To do this, simply grease the dish with the butter, lay the sheet of pastry into the dish pressing it in smoothly. Leave a little pastry as an over lap – I usually cut this off once it’s all cooked. Next you’ll need to lay a sheet of baking paper over the pastry and fill with baking beans If you don’t have baking beans you can use dried beans, pulses or rice instead. This bit stops the pastry from rising up. Bake for 20 mins before carefully removing the beans, continue to bake for an additional 5 mins.

Its not very photogenic but thats what working with pastry in 30 degrees plus does!

Its not very photogenic but thats what working with pastry in 30 degrees plus does!

Whilst this is cooking we can make the filling. Beat the eggs in a jug and then add the milk and cream and beat a little more. I always beat the eggs separately and then add the milk and cream afterwards as I have made this before and noticed whilst pouring the filling into the case, I still had a whole yolk. Now add the bacon and cheese, stir through and season with salt and pepper.

This is the crustless version with the mixture poured straight into the flan dish

This is the crustless version with the mixture poured straight into the flan dish

Next, without taking the flan dish out of the oven you’ll need to pour the mixture into the case, this is so that you can get as much mixture in as possible without it spilling over the edge. Using an oven glove, slide the oven shelf out and pour the mixture into the case. Continue to bake for 40 minutes until nice and golden on top. Allow to cool for a few minutes before removing and serving with a fresh side salad. Any left overs can be chilled and eaten straight form the fridge.

Crustless, fresh from the oven. Just like a gooey, cheesy, creamy, oven baked omelette

Crustless, fresh from the oven. Just like a gooey, cheesy, creamy, oven baked omelette

Served with salad for a yummy weekend lunch. I added a handful of chopped mushrooms to the mixture here as I had some in the fridge

Served with salad for a yummy weekend lunch. I added a handful of chopped mushrooms to the mixture here as I had some in the fridge